Monday, February 29, 2016

Road Trip Series #5: Mount Rushmore National Park

After stopping at Devils Tower, we headed straight for Mount Rushmore - it would be the last stop on our road trip before heading home the next day. It was early evening when we arrived, and since it was a chilly and windy night, we didn't hike any of the trails. We did see the monument from the overlook, and spent quite a bit of time in the Visitor Center.
(click on the layout for a larger view)


The Visitor Center had some excellent exhibits and we spent a lot of time looking at them. My son worked on his Junior Ranger booklet, and we picked up his badge before we left. It was another quick stop for us but something we wanted to see since we were so close. This was the last stop on our road trip and the last of the road trip layouts.

For these layouts, I combined a few patriotic themes papers with red, white, and blue stripes. The map and brochure were picked up at the visitor center, and I added photos of the passport stamps and my son's badge as well. The map on the second layout is the inside of the brochure that is on the 3rd page (I picked up 2 brochures while there.) 

This is the end of the 2015 road trip! Where have you gone on a road trip? What was your favorite road trip stop?

Sunday, February 28, 2016

Road Trip Series #4: Devils Tower National Monument

After leaving Yellowstone, we stopped at Devils Tower National Monument in Wyoming. It was a long drive through the curvy mountain roads of Shoshone National Forest and Big Horn National Forest, and it was only our first stop for that day. But it was worth it! Devils Tower was was one of those monuments that you expect to be pretty cool, but turns out to be way more impressive than you thought it would be.

(click on the layout to view a larger image)
  

We only spent about 2 hours there, which was enough time to walk the trail around the base of the tower, and to complete my son's Junior Ranger booklet and earn his badge. 

I didn't take a lot of photos when we were there, so I only created 2 layouts for this park. While we were there, I picked up a map and brochure for the scrapbook, and my son collected the passport stamps and his badge and patch. After we got home I took photos of these so I could add them to this page. I wanted to keep the papers simple and had one piece of striped paper that had these rough lines running down it that matched perfectly, and added the brown paper with small dots and that was all it needed.

The next (and last) stop is...Mount Rushmore!

Saturday, February 27, 2016

Road Trip Series #3: Virginia City Ghost Town

After leaving Glacier, we drove about 9 hours to Yellowstone National Park. On the way we stopped at Virginia City, Montana, an old 1860's mining town. Technically a ghost town since there are no permanent residents, Virginia City is now a tourist attraction and there are businesses there, but it is considered one of the most intact towns from that time period, and definitely worth stopping at. There are 2 towns just a couple of miles apart - Nevada City and Virginia City, we stopped at both.
(click on layouts for a larger view)


I actually had a really hard time choosing paper for these layouts. How do you scrapbook a ghost town? It's not like there are papers and supplies with a ghost town theme, and I didn't want it to have a halloween type feel. I choose some rustic papers that had a little bit of a modern design and added a few pieces of paper with some old fashioned patterns - almost like old wallpaper, and decided to blend the two. The color combinations went together, so I decided to go with it. I added some photo corners to a few of the photos for a little bit more of the old fashioned feel.

We stayed in Virginia City for an about hour, then got back on the road to get to Yellowstone. It was a good stop, the kids really liked it and we would have stayed longer if we could have. 

Next stop - Devils Tower National Monument
We went to Yellowstone from here, but again that's not in this album so I'll skip it. On with the road trip!

Friday, February 26, 2016

Road Trip Series #2: Theodore Roosevelt National Park

The second stop on our road trip was Theodore Roosevelt National Park in North Dakota. We left Jamestown and had a few hour drive to get there. We had been on the road for about 13 hours when we arrived and were ready for another break from the highway, so we spent about 2 hours in the park. We hit the visitor center first and then did a scenic drive through the park to view wildlife.


(click on the layouts for a larger view)


We saw tons of bison and prairie dogs here, and it was our first experience with bison on the road. It is a beautiful park with really unique landscapes. 

For the layouts, I kept them fairly simple with earth-toned paper and and a few travel-themed embellishments. I just wanted it to have an earthy and natural feel.

I forgot to pick up a park map when we were there (gasp!) so I didn't include it in the layout. I know...I missed one of my own self-proclaimed critical elements for scrapbooking! Chalk it up to very little sleep, being awake since 3am, 13 hours in a very enclosed vehicle, and this being our first national park - we had to buy passport books, get stamps, get a junior ranger book, get patches, and figure out what to see and how to get there. So I missed the map, it happens. I think I must have had one in the park, but it never made it home. Even without it, I'm still happy with the layouts.

Next road trip stop - ghost towns! 
Well, it was actually Glacier, but we're skipping that since that is not in this album...you can see those layouts in the Gallery.

Thursday, February 25, 2016

Road Trip Series #1: Jamestown, North Dakota

With some of my larger projects now complete, I'm finally catching up on some of the smaller ones. With just a few layouts left from our road trip last summer, I thought it was time to finish up the layouts for the rest of the national parks and roadside attractions we stopped at along the way.

So we're going on a virtual road trip! There will be 5 stops along the way. Our first is Jamestown, North Dakota.

We planned to stop here for an extended lunch, and after 9 hours in the car that morning we needed to stretch our legs for a bit. While in town we visited the World's Largest Buffalo Statue and Jamestown Frontier Village.

(click on the layouts for a larger view)


For these layouts, I used a travel theme kit from Paper Studios. The pictures were pretty fun and colorful and lent themselves to a nice, colorful layout.

The buffalo statue and the village were pretty fun roadside attractions and worth stopping for. The kids really liked the village and probably would have stayed longer if we would have let them. But we needed to get back on the road - there was more to see that afternoon!

Next Stop - Theodore Roosevelt National Park.

Tuesday, February 23, 2016

Adding Some Finishing Touches


Last 2 Yellowstone layouts
Yesterday I finished up the Yellowstone layouts and got all of the photos on their pages. I had finished up 10 2-page layouts over the weekend, and had 7 more to go. I started working on them in the morning, and got down to the last 2 layouts before noon. It was exciting to finish but also a little sad. I started working on these books right after Christmas, so it's been about 2 months of near constant work, planning, or thinking about these books. I finished up the last 2 layouts, took a few moments to feel quite accomplished, and cleaned up for the day.


Leftover supplies that I can add to the books
Today is the day to go back and start adding the finishing touches. It usually takes me more than one day to do this, so today is like the first pass. I spread all of the remaining supplies for the project on the table and start going through each of the layouts.

Many of the layouts I had already added embellishments and journaling cards to along the way, but some I didn't. Now is the time I go back and start adding details to pages that need it - pages that look a little empty or need a little something, and pages that I want to add journaling to. I was surprised at how many journaling cards I had added to pages that I needed to go back and write something on now - I think I did about 12 cards this morning! Journaling is really starting to grow on me. I also added some brads, borders, and some nice Yellowstone clip art pieces that I found online and printed. Most of the pages didn't need a lot, just some little touches. It can also be hard to not add to much - just because I have the extra supplies doesn't mean I have to use every single piece. So I just add a little at a time until I think it looks balanced.
Added the journaling and the location-marker brad at the top of the photo, and the little arrow

Added the bison graphic that I found online and printed

Added the arrowhead graphic, a little journaling, and the location marker brad

There are a few more pieces of clip art that I want to print out, but I ran out of color ink this morning so it'll be a day or two before I get those done. For now, I'll set the books aside for a few days and take a break, then go back through them one more time before officially calling them complete! 

Coincidentally, I ended up with the exact same number of pages in these 2 books as I did the Glacier National Park books - 73 2-page layouts, 146 total pages. I had printed out about the same number of photos but had no idea that I'd end up with the same number of layouts! I hope to be done in a few days, and then I'll photo the albums and upload them into the online gallery.

Up next...The Road Trip Album. 

Monday, February 22, 2016

Mountain Biking Layouts

Today I finished up some mountain biking layouts for my son's album. Last summer he participated in a youth mountain biking club, and I took a few photos of him at the traihead. (Sadly, no group photo as that would have way too embarrassing for him! I'm always "that" mom with the camera in her hand!)

I had to search a little bit for some biking related scrapbook supplies since there is not a lot out there, but I found some by Scrapbook Customs that worked pretty well.


He also did some biking through our school distict's summer school program - he did 4 of the 5 trail trips they offer. Before he left I handed him my point-and-shoot camera and he took a few photos along the trail. It is always fun and interesting to me to see what my kids take photos of when they have the opportunity. With his photos, I made 2 layouts of those bike trips.


We are planning to do more mountain biking this year so I will have to start looking for more biking papers and supplies - we have a goal to bike a few state trails end-to-end once spring and summer get here. Mountain biking is my son's favorite activity and it'll be good for all of us to get out on our bikes more. More biking adventures to come in 2016!

Tuesday, February 16, 2016

Scrapbooking National Park Trips

I've been spending a lot of time these last few months scrapbooking several different National Parks. National Park trips are a must-do vacation for many people and families at some point. Whether it is a day trip to a park near your home or a week long vacation out west, National Parks are not only great to visit, they are great to scrapbook! There are so many iconic photos you can take of the beautiful landscapes and surroundings – mountains, canyons, waterfalls, nature trails, old lodges, unique buildings, and interesting wildlife.

If you are planning a National Park trip, there are many different things you may want to add to your scrapook. Here are a few things to keep an eye out for or think about adding to your book:


1. National Park Sign - a picture of the National Park is a must! Whether it is the sign alone, you with the sign, your family and friends with the sign, or all of the above, just get a picture of it...or several! National Park signs are iconic and instantly recognized and you'll want one on your scrapbook.

2. Park Maps and Brochures - be sure to pick up any park maps and brochures that you find along the way. You'll most like use these as you travel, and they are great to add to your scrapbook. I always pick up 2 so that I can keep one intact and cut the other apart if needed.


3. Visitor Centers - many National Parks have great Visitor Centers and Ranger Stations. Stop in at these and take a few photos of the old structures or great exhibits. While you are there, look for brochures and maps, and get a Passport stamp!
4. Passport Stamps - our National Parks system has a Passport Stamp program that is available at almost all parks and monuments, and it is free. In most visitor centers and ranger stations there will be a small booth that has the passport stamp (sometimes they are at the info desk or by the checkout of the gift shop.) The stamps are free and can be stamped onto whatever you have - can you use a book or piece of paper. These can be fun to collect and many parks have multiple stops for stamps at the various visitor centers throughout the park.


5. Pull-outs and Turn-outs - most scenic drives will have various pull-outs and turn-outs for you to stop and take in the scenery. Some parks have a lot of these and it's easy to lose track of what you saw where. Most will also have a sign of what that particular pull-out is named or what you are looking at. Snap a picture of the sign before you start taking scenery pictures...when you get home, you will know exactly which pictures were from which overlook. You can also use those sign photos as labels in your book!


Glacier National Park Scrapbook Page Logan Pass Hiking Trail
6. Trailheads - if you do any hiking, the trail should be marked with a trailhead sign. There will most likely be additional signs showing distances and directions on the trail. Snap a photo of the sign before you head out on your hike.

Yellowstone National Park Scrapbook Page Roosevelt Lodgel
7. Lodges - many National Parks have historic lodges on site, and all of these are open to the public - you don't have to be staying there to walk through the lobby, eat at the restaurants, or shop in the gift shops within them. Visiting the old lodges can be a fun part of your trip, just like seeing the rest of the sites in the park. We try to stop at any of the lodges we are not staying at to check them out or grab a meal, but also to sit on the porches overlooking a lake, walk along the beach or lakeshore behind them, and just take in the scenery. Some of these lodges have great architecture and huge old logs that you may want to get photos of for you book.

Yellowstone National Park Scrapbook Page Elk Wildlife Viewing
8. Postcards - the National Park Service has some great postcards - many depicting historic artwork of scenes in the parks. Pick up a couple of your favorites - there are tons to choose from and the art makes a great addition to your scrapook!


Devils Tower National Monument Scrapbook Page Junior Ranger Badge
9. Junior Ranger Badges - if your children want to participate in the Junior Ranger program, pick up the booklet at the visitor center and work through the booklet during your visit. Before you leave, stop back to the visitor center where a Ranger will check over the booklet and award your child their Junior Ranger badge. Some places also have a Junior Ranger Patch that you can purchase after you earn the badge. We've participated at several parks - they can range from fairly easy to quite difficult to earn! But they are fun to do, make for great photo ops, and once home you can take a photo of the badge or patch and add it to your book.


10. Scenery shots and detail shots - most people travel to national parks and monuments to take in the sights and see the monuments. When taking photos of these places, be sure to get a lot of scenery shots, but also detail shots. I've talked about detail shots before in this post, but take a few minutes to walk around and really notice the little details - bark on a tree, texture of old bricks, smooth rocks on the lakeshore. These can be great and unique additions to your scrapbook.

With so much to see at our National Parks, it can be hard to get it all in. If you miss a photo of a place or a sign, you can often find them online by doing an image search. I often copy or download images from the web and use them in my books if I've missed a photo that I later realized I wanted for an album. 

Most importantly, enjoy your trip to the national parks!  They are amazing places and so much fun - take tons of pictures and experience all that you can - then when you get home you can make an amazing scrapbook!

Monday, February 15, 2016

Embellishing Your Scrapbook Pages with Memorabilia

If you collect a lot of memorabilia on your travels, then you know it can sometimes be a challenge to fit it all into your scrapbook. When I travel, I'm sure to pick up every brochure, flyer, handout, and map along the way! Many of these we use while traveling, and most of them come home to be put in the scrapbook. Sometimes the memorabilia itself can take up a page or two in the scrapbook, and that's before you've added any photos to the page!

So how can you fit your memorabilia into you scrapbooks?  What should you use and what can be left out?

First, gather all of your photos and memorabilia together. Be sure to have everything you want to use, since it may be hard to squeeze things in after the fact! If you have duplicates of flyers or maps, keep them for now as you may want to use different pieces of them on different pages. 


When you start laying out your page, you'll need to decide where and on what pages you'll want to have certain things. 

  • Have a map or brochure on the first page. 
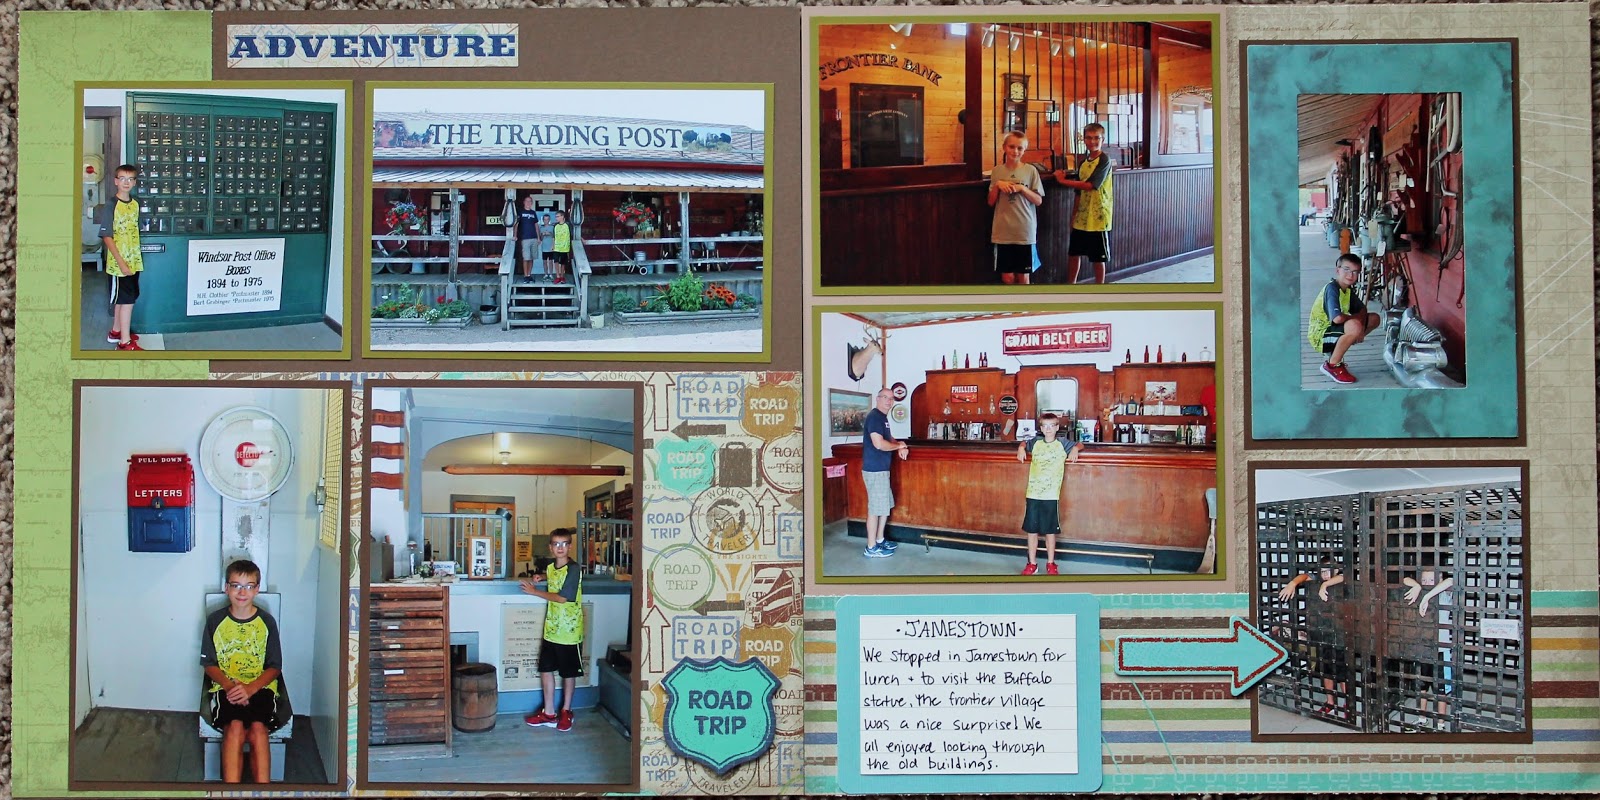
  • Arrange your photos around the memorabilia instead of trying to fit the memorabilia around your photos.
  • Spread out the memorabilia throughout the layouts, especially if you are doing a multiple page layout - have 1 or 2 items per layout instead of everything on the first layout.
  • If you have 2 of the same item, keep one intact and cut pieces or pages out of the other one.
  • Cut out pieces of the brochures like small maps, fun facts, or logos and just use those.

Here, I had 2 copies of the same flyer, so I used the flyer open to display the map on this layout, then used the other flyer intact on the next page since I had the space for it.


Memorabilia can also be used as a great space-filler if you are short on photos. On the layout below, I only really had 2 photos for this page, so using the flyer on the side helped me fill the page and add some nice details about the place we were.  


There may be times that you can't fit all of your memorabilia onto your layouts, and that's okay. I often have a few things that I discard after I choose my favorites to use in the book - on these pages I tossed out a couple of brochures and our parking pass.

When you are out and about, try to pick up 2 pieces of memorabilia if you can. You can always scan the one you have and print it out at home if you find yourself wishing you had two. Many brochures and maps can also be found online and printed at home if you didn't pick them up. Memorabilia is a great addition to any scrapbook - use as much as you can!

Wednesday, February 10, 2016

Back At It!!

Today I'm back to working on the Yellowstone book. I'd taken about a week off from looking at it. I had finished a bunch of layouts last week and was feeling burned out on it, so I put it off to the side for a few days and didn't think about it. Sometimes taking a break from a project is good - it clears your mind which helps motivate you to pick it up again! Losing motivation to work on scrapbooking can be complete and unexpected. As much as I may love what I'm working on, I just don't want to look at it anymore. Like at all. But after a break, I can't wait to get back to it!

So instead of the trip pages, I worked on some holiday pages from last year that needed to get done - Halloween and Christmas Eve. Since I had pulled supplies for these pages earlier and had them ready to go in my project bin, I got them done fairly quickly.  


Halloween ended up being only 2 2-page layouts, while Christmas Eve turned out to be 6 2-page layouts. I still have to do Christmas Day, but I'll save that for another time. Right now, I'm back to the Yellowstone pictures. 

I have 3 more sets of photos to do from that park, and today I wanted to finish up the layouts from one particular section of the park. With the number of photos I had, it ended up being 6 2-page layouts. Here is the first of the visitor center:


We also took a lot of photos along the shore of Lake Yellowstone. I decided to keep these layouts pretty simple and serene, since that morning on the beach we were the only ones there - it was very clam, peaceful, and quiet, and I wanted the layouts to reflect that. All the pages needed were a few colored papers and a few subtle patterns.


With these done, I have two more sets to scrap until I'm finished! I'm very excited to finally see the light at the end of the tunnel. It will probably be about 20 more 2-page layouts, and I'm hoping to have them done in the next few weeks. 

Even though I lost my motivation for a week or so, taking a break allowed me work on a few other pages, and spend some time doing some other things besides scrapbook. When scrapbooking starts to feel like work then it's time to take a break - sometimes that break lasts a few days, sometimes longer. And that's okay. That's what is great about scrapbooking - there are no time constraints, no right or wrong ways to do it, no deadlines. Just pick up where you left off, or start something new - you'll be glad you did.


Friday, February 5, 2016

What Progress Feels Like

We all know that feeling. That feeling you get when you look at a huge stack of photos that you have either just printed, or are way behind on, or have just been sitting in a box way to long. Those photos that have been sitting there, staring back at you, waiting for you to do something with them.


Sometimes that feeling is excitement. Excitement to start a new project, to work on something you've always wanted to do, or to finally tackle that album that you've always hoped to make. Excitement to get new supplies and a new album, knowing that you will create something amazing out of it all, but not yet knowing exactly what it will be.

But often that feeling can be dread. When will you get it done, how will you do it, when will you find the time? What if it doesn't turn out good? What if you don't finish?

Scrapbooking has taken me from days where I literally couldn't wait to work on a page, to months of not working on anything at all. But when you finally do get down to work, and find the right photos with the right supplies at the right time in your life, something amazing can happen. Happiness. Joy. Accomplishment.


I've recently completed a fairly large-scale project, and am close to finishing a second. We took a vacation last August to Glacier National Park and Yellowstone National Park, and since we drove out we stopped at 3 other national monuments and parks along the way. I took over 2,600 photos, of which I ended up printing 1,303 photos: 565 from Glacier, 559 from Yellowstone, and 179 from the rest of the road trip. 

I knew scrapbooking this trip would take not only a lot of time, but a lot of supplies and a lot of creativity. I wanted these books to be different that what I've done in the past, and unique in their own way. I also wanted to use just one product line for each album - to have a more cohesive look and feel to the albums, but to each have their own unique look. I searched for a few months, even before our trip, for the right supplies. It was really difficult to find something that worked with the content of the photos and also the color scheme. I wanted it to be outdoorsy, but not woodsy, with an out-west vibe but not western themed.


I ended up choosing two product lines: We R Memory Keepers Indian Summer, and DCWV Weekend Neutrals. Indian Summer went with the Glacier pictures, and Weekend Neutrals went with the Yellowstone. I ordered supplies, bought albums, printed the photos, and could begin. That was 4 months ago.

I've finished the Glacier books and the Yellowstone books are about half way done. What began as 1 album per park quickly grew to 2 albums per park, but I didn't mind the extra layouts, since I was so happy with how the pages were coming out, and I had so many photos that I wanted to include. I've let the finished albums sit on the shelf now for a few weeks, then pulled them back out today to take a final look through, to see if I wanted to add or change anything. I added a couple of small embellishments here and there, but in the end I was happy with everything in the books. They are officially done!

The 2 12x12 3-ring albums hold 73 2-page layouts, including cover and back cover pages on both, for a total of 146 pages. The pages are packed with photos and mementos from our trip. It's an exciting feeling to be done, and to feel like I've created something that I know we will cherish and look through for years to come. 

The 2 Glacier albums can be viewed here:
Glacier Album 1 - Many Glacier
Glacier Album 2 - Going-to-the-Sun Road

Please check them out - I hope you find will ideas to use in your next album!

What project are you most proud of? What projects do you still have to work on?


Thursday, February 4, 2016

Scrapbooking Disney Vacations

Scrapbooking a Disney vacation may just be one of the happiest things on earth. After the joy of your trip you get to practically relive it by spending hours looking at the pictures and journaling your memories! Since there are so many great photo opportunities at all of the Disney parks that I thought a post about Disney albums was much needed. 

My first really large scale scrapbooking endeavor was scraping our 2010 Disney World Vacation. It ended up being 4 3-ring albums filled to the brim and took me over 3 years to complete. In the end I had 171 2-page layouts (including back and front covers for each book), for a total of 342 pages! I had 1 album for Magic Kingdom, 1 for Epcot, 1 for Animal Kingdom/Hollywood Studios, and 1 for travel, the hotel, and Downtown Disney.
  
When you’re at Disney, there is so much to see and do, but as a scrapbooker you always have to be looking for more – you have to be looking not only to capture those great memories, but be on the lookout for maps, brochures, times guides, and anything else you might want to add to your scrapbook once you get home.

Disney World Scrapbook Page Epcot Spaceship Earth
Disney World Scrapbook Page Animal Kingdom Expedition EverestGreat photos are an important part of your Disney album. While in the parks, be sure to take photos of:

  • Park Icons - the Castle, the Tree of Life, Spaceship Earth - any main feature at the park.
  • Ride Signs - before hopping in a ride, snap a photo of the sign.
  • Pictures on the ridesI cannot stress enough how fun taking pictures on the rides is. I have literally captured my most favorite photos of my children’s faces while on the rides. In addition, I’ve taken some great shots ascending the roller coasters and during the rides themselves. Just pull your camera or phone, hold it up and snap away!
  • Pictures from the queue lines or from around the ride. There are so many details in each of the rides, as you are standing in line take look around and photograph some of these small details.
  • Character Photos - if you meet characters, be sure to get photos with them!  The PhotoPass folks will take photos with your own camera as well as theirs.
  • Food & Menus - Disney is known for great restaurants and food, so take a quick picture of your meal or of the restaurant menu. It'll make a fun addition to your scrapbook page.
  • Fastpasses - before handing over your Fastpass, take a photo of it (for parks that still use the paper tickets.) These tickets will show the name of the ride, the date, and the time that you rode it!
  • Disney Photos on Rides - after some rides there are screens that show photos of you on that ride. Some of these will link to your PhotoPass account, but some have to be purchased. Take a photo of your photo on the screen! Take multiple shots just incase you get some glare. I've done it many times and they've turned out great.

While you are at the park, you may want to collect certain mementos and keep an eye out for things to add to your album, such as: 
  • Park Maps & Times Guides  - pick up a couple of each, you may want to leave one intact in your scrapbook, and cut other parts out of an additional one. They are also good reference once you are home for names of rides, shows you saw, and restaurants you ate at.
  • Park Tickets - be sure to save your park ticket or swipe card and put these in your book!
  • Autographs - if you or your children collect autographs, collect them in the parks and when you get home take photos of them. Then print them out and you can add the autographs to your books!
  • Kids Discovery Club booklet and stamps from Animal Kingdom. If your kids pick up the KDC booklets and compelete any of the activities, they can get a stamp in the booklet. Pick up a spare booklet for the scrapbook if your kids want to keep their own original booklet!
Disney World Scrapbook Page Magical Express Mickey Bus
  • Magical Express tickets and vouchers. If you use Disney Magical Express you should get a packet with your vouchers - these can be another nice addition to your book.
  • World Showcase Stamps from EPCOT Passports - each country has a station where you can get a stamp in your books (or on a sheet of paper) and your name written in that countries language. Again, you can photograph these at home and add them to your books if you don't want to use the originals.
  • Disney Animation Academy - participate in the academy drawing class and add your drawing to your book.
  • Redwood Creek Trail Challenge at Disney California Adventure - pick up the map and complete the challenges! Save the map for your book - and get a sticker from the attendant upon completion.
Disney World Scrapbook Page World Showcase Stamps

These are just a few of the fun Disney ideas that you can add to your scrapbook. Things are always changing at Disney Parks and there may be many other great ideas of things to add to your scrapbook. Please comment below with any ideas you've used in your Disney albums!

For additional Disney page ideas, please see the Gallery for trip albums from Epcot, Animal Kingdom, and Hollywood Studios.