Showing posts with label scrapbooking. Show all posts

Wednesday, November 15, 2017

Zion National Park Scrapbook Cover Page

Last August our family took our annual National Parks vacation and this year we headed out to Utah. There are 5 national parks in Utah, as well as many other National Monuments, but the seeing "Mighty 5" was our goal: Arches, Canyonlands, Bryce Canyon, Capitol Reef, and Zion. Zion has been on our short list for a while now, and it did not disappoint. It was simply gorgeous.


I had a little bit of a hard time choosing a paper collection for these photos. I had previously purchased the We R Memory Keepers High Five collection, but wasn't sure about using it on these photos. The main colors are black, white, green, and yellow, and I wasn't sure that it would work the best with these photos - the rocks of Zion have so much deep red and brown in them, and I thought maybe I should use papers that highlight that?

But I loved the collection and I thought it had a bit of a southwestern vibe mixed with a bit of nature and that it could work. I was able to coordinate a bunch of other nature and outdoors themed papers with it so that I could mix and match, and have enough to do the full album.


For this cover page, I kept things fairly simple: a big bold heading, one large scenery photo, and one photo with a little more detail. And with a tag, some washi tape and a few embellishments, the page was complete.


This was my first time using washi tape and I have to say...I love it! I used it as a border to frame out the 5x7 photo, and used it again to frame out the title.


This was a fun layout to make and came together in less than 30 minutes. I think my favorite piece is the heading with the big block letters. 

Thanks for looking!

Wednesday, November 8, 2017

First Day of School - Last Day of School Scrapbook Page

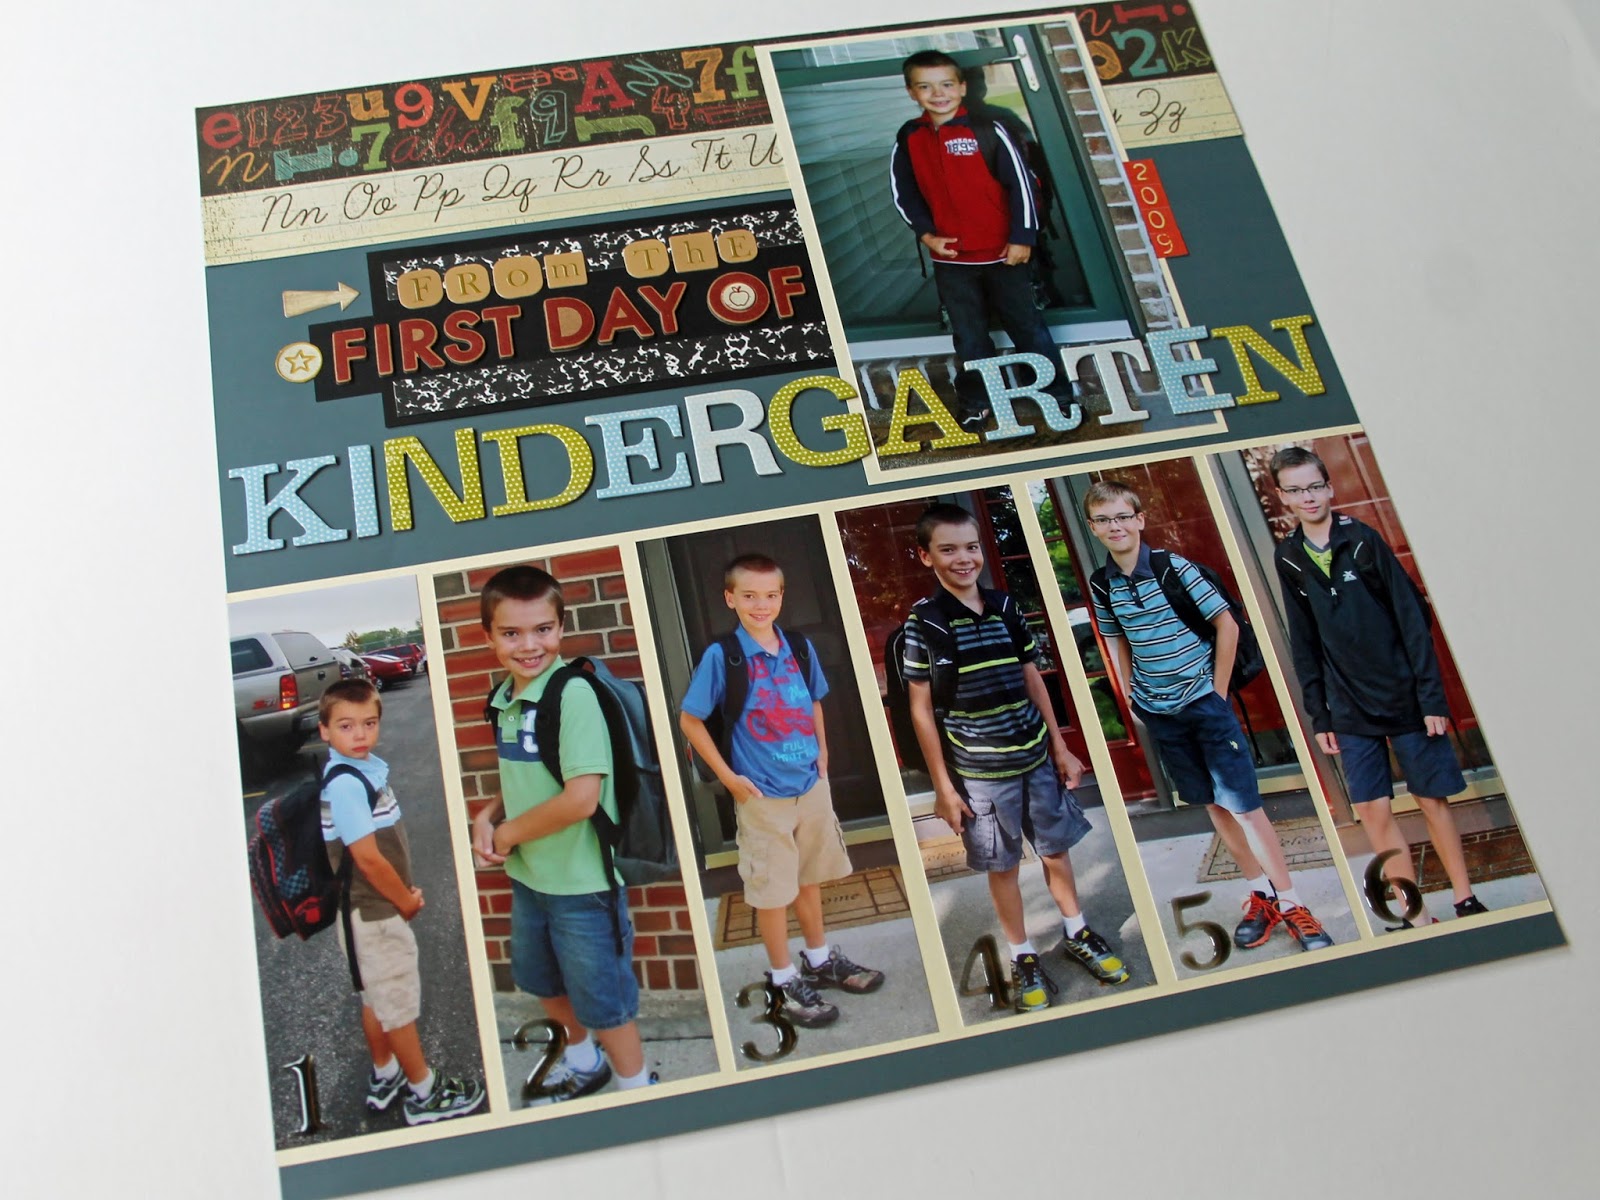
After completing the School Year Photos layout, I had fun idea for another collage type layout for my kids school years - a page for all of the first day of school photos. What began as an idea for just the first day of school photos turned into a First Day of School - Last Day of School 2-page layout, highlighting the first day of Kindergarten, and what will be the last day of High School.


First Day of School Year Photo Collage Scrapbook Page Layout

Again I had to go back and collect all of the first day of school photos. Thank goodness for digital technology and computers - they were all basically at my fingertips - just a few clicks away!

First Day of School Year Photo Collage Scrapbook Page Layout

After gathering the photos, I tried many variations of the layout before deciding on this one. My original idea was to have one long strip through the center of both pages with all of the school years, but I realized that 6 thin photos was the most I'd be able to squeeze in a 12x12, and I couldn't get the Kindergarten picture in. I considered just doing grades 1-12, but really wanted to keep the Kindergarten photo in. So I moved it to the top and realized I could balance it out on the other side with what will be a Last Day of High School photo. With that, the layout was set.

First Day of School Year Photo Collage Scrapbook Page Layout

To accent the photos, I added a border across the top of both pages - different borders but from the same paper collection and same color scheme. I created the labels with a black piece of cardstock and various colors of chipboard letters. I really wanted the words "Kindergarten" and "Highschool" to stand out, so I used a larger chipboard for them, and placed them running over the photo (the H is not yet attached, I'll need to put the photo under in first.) To label the yearly photos, I added transparent gel numbers to each photo - they are noticeable but yet subtle enough to not distract from the photo.

First Day of School Year Photo Collage Scrapbook Page Layout

It was so fun making this layout, even though it is a work in progress and not yet complete. Each year I'll just add one photo and 5 years from now it will be complete!

Thanks for looking and I hope you are inspired to make a few school year pages for your kids!

Tuesday, November 7, 2017

School Photos Collage - Through the Years Scrapbook Page

I recently started working on my kids school year albums again, and decided that I wanted to do a 2-page layout of their school photos. I've often seen those picture frames where you can add each year's photo into a collage, and so I wanted to do a scrapbook version of that.

School Year Photo Collage Scrapbook Page Layout


The first step was gathering up all of the photos of the same size from each year, this proved to be the most time consuming part of the process. I had some of the photos in the right size, but searched through 4 photo boxes to find a straggler here and there. With 2 still missing, I asked my husband if he still had any old school photos of the kids at work, and he did! The last 2 were found.

School Year Photo Collage Scrapbook Page Layout


From here I laid them out in various arrangements to see how the years would best be grouped or sequenced. I knew I wanted to add a large graduation photo as well, so I made that the highlight of the second page and arranged the small photos around it, with the 4 high school year photos above the graduation photo.  

School Year Photo Collage Scrapbook Page Layout


This layout was really quite simple - I chose a subtle pattern paper for the background of the collage page, and mounted each school photo on grey cardstock. I needed one filler square in which I added a journaling card with a nice quote on it.  


The Graduation embellishments came mostly from the Echo Park Grad kit, and one other graduation sticker sheer I had on hand. To add each grade, I printed out the numbers in a font that I liked, and punched them out with a 1/2" circle punch. And that was it! Here is the final layout.

School Year Photo Collage Scrapbook Page Layout

I'm happy to have this done, and I had the pleasure of making 2 of these, one for each of my boys albums. Now, all I have to do each year is add the photo. So easy.

After finished up these layouts, I came up with another school year layout which I am really excited to share tomorrow!

Monday, November 6, 2017

Creating Your Own Journaling Cards and Embellishments

If you've taken a look at any of my pages, you probably know that I tend to love journaling cards. Not always so much the journaling, but just the cards! I love cards with just graphics on them and especially love cards that give you enough room to write just a little bit, but not a whole novel.

I recently tried my hand at making some of my own journaling cards, and was quite happy with how they turned out. I've been cleaning out my scrap paper lately and thought this might be a good way to use up some bits and pieces of various papers instead of just tossing them away.


The first set I decided to try was for a fishing themed set. I had an old set of fishing stickers, and matched together 4 different coordinating papers, 2 colors of cardstock, and went to work. I was able to create 5 3x4 journaling cards and 4 2x2 cards. In addition to the stickers, I stamped 3 designs and added them to the cards. I thought these turned out really nice, a little bit of a vintage look but able to coordinate with just about any lake or fishing papers.
 
 
For the next set, I tried using up a myriad of different leftover camping stickers, scrap paper and journal cards. I have a lot of miscellaneous camping paper scraps, sticker sheets with just a few stickers left on them, and leftover cards from other sets. Since they don't really coordinate with anything on their own, I coordinated them together.
 
 
Using all of these supplies and a few stamps, I was able to create a large, colorful set of cards and embellishments.  Plus it felt really good to put those old supplies to use and not just toss them in the garbage!
 
 
The last set I made are not so much journaling cards, but accents for any zoo, safari, hunting, or even hiking pages. By using a scrap of paper with tracks on it and cutting them apart, I mounted each of them on a coordinating background paper and then onto cardstock. I love these little prints, they will make cute accents to any number of pages.

I definitely learned not to let my scraps go to waste - I have always saved them but now I have something to do with them! 

Have you ever made your owen embellishments from scraps? Please share!

Friday, November 3, 2017

The Total Solar Eclipse Scrapbook Pages

Back in August my son and I made a spur-of-the-moment road trip to view the total solar eclipse. The closest place to us that would experience totality was St. Louis, so that's where we went. Once in St. Louis, we watched the eclipse at Jefferson Barracks Park in south St. Louis where they were hosting a large viewing party.

I could not wait to scrapbook these photos, and I had so much fun creating these pages. On these pages I included a small poster from the day, a small poster from the event we were at, and our actual eclipse glasses.


I had chosen to use the Simple Stories 24/7 collection for this album, since we stopped at several other sites in the area and on the way, and I had several other pages to make. I wanted to use one paper collection for them all, but also knew that I'd need something special for the eclipse. 


I was able to find one amazing sheet of moon paper showing the different phases of the moon. These phases look just like the eclipse phases and it was perfect. (This paper is from We R Memory Keepers High Five collection and the paper is called Lunar.)


Once I had the black and white moon paper, I decided on the rest of the color scheme for these layouts - choosing yellow to highlight the sun photos, and a slate blue to accent, basically because I liked the look of it! Yellow and blue are always good together. I found a few patterned sheets in yellow and blue that were part of the 24/7 collection, and the patterns really worked for this.


For the actual eclipse photos, I had planned to do a collage but wasn't sure how many photos to include. I had taken photos that day using my DSLR and shooting through the solar eclipse glasses that I had. (Yes it work's but they come out a bit hazy, but it's better than nothing.) So I chose 10 of the best ones, attempting to show the different phases of the eclipse.


To accent the collage, I added pieces of the patterned papers that I used earlier, and added a couple of small and simple embellishments. I wanted to keep these pages very simple and let the photos stand out.

Here are the final 3 2-page layouts together:


Scrapping these photos was so different from what I'm used to working on and it felt great to do something a little different.

Thanks for looking! If you scrapbooked the eclipse - please share your pages with me, I'd love to see them!

Wednesday, November 1, 2017

Quick and Easy Collage Cover Page for St. Louis Road Trip

Yesterday I began working on a few photos from a quick road trip my son and I took in August to see the total solar eclipse. We drove to St. Louis, stayed overnight, and saw the eclipse the next day. I had chosen to use the Simple Stories 24/7 collection for these photos since I liked the look of it and color scheme, and it was a set of supplies I had on hand! One of the sheets included in the pack was a pre-printed photo collage. This page was perfect for a cover and ended up being one of the quickest and easiest covers I've made. Since the page already had the frames and inset patterns, all I really needed to do was add a few photos, a couple of tags, and label them.


I chose one small photo for each of the places we visited, one additional photo of my son and I, and decided to use two frames for labeling our trip. I trimmed down the photos to fit and added some lined paper to one of the frames to add the journaling. 

Although the purpose of this trip was to see the eclipse, we stopped at several other places along the way, so I wanted to be sure to include those as well. But the highlight really was the eclipse. 


There were a few frames in which I didn't really like the graphic that was there, so I covered it with a cut-down journaling card or sticker over the top.

This layout took about 15 minutes and was really fun to make. I loved the clean and simple look of this page, and the idea of this mosaic-grid-collage style page inspired me to try to incorporate this look into the entire album.

Here is the final layout:

Thanks so much for looking!

Thursday, February 2, 2017

We all Start Somewhere: First Scrapbook Page

I thought it would be fun to go back and take a look at the very first "real" scrapbook page I ever made. I say "real" because I did do some decorated photo albums before this, but I don't really consider those scrapbooks in the real sense. 

I really started scrapbooking after my first son was born in 2003, and almost the entire first album is baby pictures, of course. For my first layout, I took the easy way out...I used a premade kit! And here it is:


The paper was pre-printed and the kit came with some cut out tags and die cuts, so everything coordinated and all I had to do was add the photos. And that's really about all I did, or knew how to do at that time.


This first set of photos were taken while we were still in the hospital. Since our son was in the NICU for the first 5 days (he was a preemie), all of the photos we have in the hospital are from the visitation room there - he was never in the regular nursery or my room. We don't have any of the usual photos that most people would have of their first child in the hospital - visitation was quite limited in the NICU, and we only got to spend about 30 minutes with him for feeding every 3 hours. With the limited time I didn't take a lot of photos, I do wish I would have taken more.


The layouts are really quite simple, but I was new to this and didn't really have any supplies other than the scrapbook kit. Over time I would accumulate much more. 

I took a look at the second layout I made and was surprised to see that I did a little better job - added some decorative metal frames and accent photos in them. 


These early pages are a good reminder that we all start somewhere, and over time things change and hopefully become better. I do see how these early layouts resemble what I still do now...everyone really does have their own style that kind of sticks with them. But we all start somewhere, and it really doesn't matter where, as long as you keep going.

Monday, January 30, 2017

Mountain Biking on the Glacial Drumlin Trail

The last of the 2016 mountain biking layouts was actually the first one we did last year. My son and I rode 15 miles of the Glacial Drumlin trail one morning, and I created four scrapbook layouts for it. 


Mountain Biking Scrapbook Page Glacial Drumlin Trail Wisconsin

Mountain Biking Scrapbook Page Glacial Drumlin Trail Wisconsin

The papers on these layouts are a combination of papers from the Paper Studios "Murphy's Square" collection mixed with one sheet of paper with trees on it, and one sheet with gears on it. Even though they were not a direct match to the other papers, they were a close enough match and I wanted to bring in a little bit of nature and a little bit of a biking theme into the pages.


Mountain Biking Scrapbook Page Glacial Drumlin Trail Wisconsin

Mountain Biking Scrapbook Page Glacial Drumlin Trail Wisconsin

I left the photos in chronological order to highlight the different things we saw along the way and the things we stopped to look at. Often I will shuffle the order of photos around to create the best use of space, but these all seemed to work in the order they were taken, so there wasn't too much shuffling. Here are the final 4 layouts:


Mountain Biking Scrapbook Page Glacial Drumlin Trail Wisconsin

Mountain Biking Scrapbook Page Glacial Drumlin Trail Wisconsin

Mountain Biking Scrapbook Page Glacial Drumlin Trail Wisconsin

Mountain Biking Scrapbook Page Glacial Drumlin Trail Wisconsin

Thanks for looking! For more mountain biking layouts please click here!

Monday, January 23, 2017

Hiking the Ice Age Trail Scrapbook Page

Early last spring we went hiking on the Ice Age Trail and hiked a short segment called the Blackhawk Segment. We only hiked a few miles of this segment since we had to backtrack to get back to our car, but it was a fun and scenic hike none the less.
Ice Age Trail hiking Scrapbook Page Layout Wisconsin

We were pretty excited to be hiking on a National Scenic Trail, and the boys enjoyed looking for the Yellow blazes that mark the trail. Along the way, I took several photos of signs and markers on the trail, in addition to scenery shots and photos of the kids exploring the trail.

Ice Age Trail hiking Scrapbook Page Layout Wisconsin

For these layouts, I used a collection of supplies called Outdoor Trail by Kaisercraft. I had originally purchased this in hopes of using it for one of our National Parks trips, but I ended up not using it for those and thought it would be perfect for these photos instead.

Ice Age Trail hiking Scrapbook Page Layout Wisconsin

Since it was so early in the year, the photos are quite neutral a with a  lot of grey, tan and brown...there is not a lot of color. To add some color to the layouts, I accented with green and orange - using green background paper and accenting with orange where I could. Even with the little bits of color, the layouts are still pretty neutral and earthy.

Ice Age Trail hiking Scrapbook Page Layout Wisconsin

Here are the final 4 layouts:

Ice Age Trail hiking Scrapbook Page Layout Wisconsin

Ice Age Trail hiking Scrapbook Page Layout Wisconsin

Ice Age Trail hiking Scrapbook Page Layout Wisconsin

Ice Age Trail hiking Scrapbook Page Layout Wisconsin

Thanks for looking!

Saturday, January 14, 2017

Harney Peak Trail Scrapbook Page

We saw a lot of great stuff in South Dakota last summer, but our best experience was hiking the Harney Peak Trail in Custer State Park. It was the most challenging hike we've ever completed as a family, and it was an amazing experience. I loved Harney Peak so much I made 11 2-page layouts for it in the scrapbook. Yes, 22 pages of just this hike. There's a lot to talk about and look at!


We made the decision the day before that we would hike Harney Peak. It was a question mark up until then, but after we easily hiked the 3 mile Sunday Gulch Trail which had a fair amount of uphill terrain, we decided we could do the 6 to 7 mile hike up the mountain. We planned to leave early the next morning, as they were calling for rain in the afternoon and we didn't want to risk getting stuck up there in a thunderstorm.


We hit the trail at 7:30am, it was a crisp and clear morning, and very quiet on the trail. Admittedly I was a little worried about this hike - how we would all feel, how strenuous it would be, and if we'd make it to the top. From the trailhead, we could not see the peak and we really didn't know where it was. So we just started hiking, and followed the signs for Trail #9.


After hiking for about 30 minutes and gradually gaining a little elevation, we rounded a bend and off in the distance we could see it. What looked like a little stone hut on the top of a mountain REALLY FAR AWAY and REALLY HIGH UP. My heart sank a little and I really started to have my doubts. But we kept hiking onward.


It was very still and quiet on the trail, we all spread out and didn't talk much. The boys trailed behind us, picking up pine cones from the Ponderosa Pines and peeling them apart - they made up some kind of game doing this and entertained themselves for quite a while.


The main section of the hike was very easy, the uphills were very gradual and you didn't really feel the elevation changing. There was always so much to look at that we just kept hiking without really noticing how high we were getting. As we started to near the peak, we could feel the terrain changing and the inclines becoming more steep. We knew we were getting closer. From here, the real hike began. A lot of uphill, and a lot of stone stairs. There were some rest areas and overlooks along the way that we pulled off into to catch our breath. It just seemed to keep going and going upward, and we still couldn't see the top or the lookout tower. 


But the higher we climbed the more excited we got - we could see for miles and knew we were getting up there, we knew it was close. We finally reached a sign for a trail that branched off that said "Harney Peak Lookout" and made our way down that trail. As we rounded a bend, we could begin to see the top of the stone tower emerge from the trees. After lots of stone steps upward, we reached the tower...we had made it! 


At the peak it was extremely windy, and there was no one else at the tower with us. We explored the tower a bit, took some photos and video, and ate some granola bars we brought along. The kids ran around and explored the tower, while I mostly took pictures and tried to capture it all on camera. We hung out at the tower for about a half hour, then decided to start making our way back down. It took us just under 2 hours to hike up, so we figured the hike down would be a little shorter. We were all a little sad to leave the peak. 


The hike down went quickly and the trail was getting much busier, we probably passed over 60 people heading up. We were the 4th group to make it up that morning, as we passed only 3 others coming down on our way up. It was great to see so many people out there hiking  - people of all ages and abilities. We practically raced down the mountain, as the kids needed to use the bathroom, and we made it back down in a little over an hour. Our full hike was 3.5 hours to cover the almost 7 miles.


I took a lot of photos on this hike and decided early on that I wasn't going to skimp on the scrapbook pages for this one - all the photos I wanted were going in! So I ended up with what might be considered an exorbitant amount of scrapbook pages for this hike, but I know we'll look back at this hike often. So here they are, all 11 layouts:


Thanks for looking! If you are ever in Custer State Park - do this hike! You won't regret it.