I thought it would be fun to go back and take a look at the very first "real" scrapbook page I ever made. I say "real" because I did do some decorated photo albums before this, but I don't really consider those scrapbooks in the real sense.
I really started scrapbooking after my first son was born in 2003, and almost the entire first album is baby pictures, of course. For my first layout, I took the easy way out...I used a premade kit! And here it is:
The paper was pre-printed and the kit came with some cut out tags and die cuts, so everything coordinated and all I had to do was add the photos. And that's really about all I did, or knew how to do at that time.
This first set of photos were taken while we were still in the hospital. Since our son was in the NICU for the first 5 days (he was a preemie), all of the photos we have in the hospital are from the visitation room there - he was never in the regular nursery or my room. We don't have any of the usual photos that most people would have of their first child in the hospital - visitation was quite limited in the NICU, and we only got to spend about 30 minutes with him for feeding every 3 hours. With the limited time I didn't take a lot of photos, I do wish I would have taken more.
The layouts are really quite simple, but I was new to this and didn't really have any supplies other than the scrapbook kit. Over time I would accumulate much more.
I took a look at the second layout I made and was surprised to see that I did a little better job - added some decorative metal frames and accent photos in them.
These early pages are a good reminder that we all start somewhere, and over time things change and hopefully become better. I do see how these early layouts resemble what I still do now...everyone really does have their own style that kind of sticks with them. But we all start somewhere, and it really doesn't matter where, as long as you keep going.
Once in Custer State Park, we drove the Needles Highway through part of the park on the way to our hotel. This very famous scenic drive offers some great scenery, and is known for it's attraction the Needles Eye. Our first drive past the Needles Eye was in the afternoon, and the high traffic and lack of parking prevented us from stopping. The next evening we drove the road again, after most of the day traffic was gone, and easily got a spot to park to check out the Needles Eye.
The vertical rock formations in this area are called Needles, and the Needles Eye is a rock formation with a split down the rock so that it looks like a needle standing up.
We looked around at the Needles Eye, and also checked out the Needles Eye Tunnel. Since there was so little traffic that evening, we could walk into the tunnel and take some photos in it. As we drove through the tunnel and came out the other side, there was a family of mountain goats on the side of the road! We stopped and watched them graze for a bit which was really fun as they were the only mountain goats that we saw in Custer.
The Needles Highway is a fun, curvy scenic drive and to reach certain areas of the park it is your only option. It's best to go in the early morning or evening if you want to stop and look around. There are about 6 tight parking spots and a lot of traffic in this area during the day.
I created 3 layouts for the Needles Highway:
Thanks for looking!
The Mitchell Corn Palace is a very popular roadside attraction when driving through South Dakota. Since we stayed our first night in Mitchell, we drove past the Corn Palace the next morning on our way out of town.
There was hardly anyone there when we stopped (early on a Sunday morning), which made for some nice photos with no crowds. Since we really didn't do anything here other than stop by to look at it, I just made 1 layout for this. I tried to use a lot of gold and brick red to highlight the colors of the building, and added an accent photo of the plaque on the building.
You really can't say the words "South Dakota" and not think of "Wall Drug." This place is everywhere. Last year when we drove home from Yellowstone we really wanted to stop at Wall Drug but we just didn't have time, so it was a must-see on this years trip. And as luck would have it, we stayed in Wall, SD for 2 nights so we got to go there twice! And we loved it! No...really, we really loved it. It was tacky and overdone and as annoying-tourist-trappy as you can get and we still loved it.
We went in the evening around dinner time, and the biggest crowds of the day were gone and it was fairly quiet in there. It's a big place and each room of shops just leads to another room of shops that connect to each other for the entire block. Then you go out back and there is a big play are for the kids, and then behind that is another whole building of more shops!
We managed to wander around for a couple of hours, eat dinner, and hang out while the kids looked at the animal statues and all of the other weird and funny stuff in there. We went back our second night just to get dinner and spend some more time walking around, and only bought a few small souvenirs.
Many people cringe when you mention Wall Drug, but we really liked it. I think being there when it was less busy definitely helped, fighing large crowds through the place would get tiring pretty quickly.
I created three 2-page layouts for this stop as well. I tried to choose papers that gave it a rustic and old-fashioned feel, and also worked with the colors in the photos - since I wasn't using any green in this book I accented with the gold/yellow in the Wall Drug sign. Some rustic wood papers, an old floral wall-paper type design, and one bold pattern was all it needed.
If you ever head to South Dakota, do stop at Wall Drug! Also in the town of Wall is our next stop - the National Grassland Visitor Center.
Our second stop on our South Dakota trip was Pipestone National Monument in Pipestone, Minnesota. This park was a little bit out of the way, about an hour north of the interstate, but we wanted to stop and visit while we were in the area. It ended up being a pretty neat place.
We arrived at about 3pm and had about 2 hours there before it closed. They also offered the Junior Ranger program, so my son got his book and we started touring the visitor center. We also hiked the Circle Trail, a one mile path through the park that takes you past the pipestone rock formations. There is also a nice waterfall on the hike.
After finishing up the hike and visitor center, my son got his badge and we finished up just before closing time.
I ended up creating 3 2-page layouts for Pipestone, and included the park map and photographs of the National Parks Passport stamps that we got at the park. These pages were also created using the We R Memory Keepers Shine collection, and I used a lot of red paper and accents to highlight the red pipestone we saw there. The final layouts turned out like this (please click the layout to see it larger):
From here we finally headed to the South Dakota border and made it into Mitchell, SD at about 6pm. After visiting 2 national parks, being on the road and traveling for over 12 hours and covering 555 miles, we were happy to get to our hotel and rest.
UP NEXT: Wall Drug!
Hello! I've been hard at work the last few months working on scrapbooking our South Dakota trip from last August, I finished up the album this weekend and am ready to start sharing the layouts! The album has 43 2-page layouts and covers 11 different places we visited in (and on our way to) South Dakota. The first stop on our trip last August was Effigy Mounds National Monument in Harpers Ferry, Iowa, on our way to South Dakota.
We arrived at Effigy Mounds at about 8:30am and spent about 2 hours there looking around the visitor center and taking a hike. It was extremely mosquito-y there and the rangers warned us about not going hiking without any bug spray. Luckily we had bug spray and so we braved the bugs and hiked a short 1 mile trail uphill to the scenic overlook which overlooked the Mississippi River.
In addition to the hike, my son completed his Junior Ranger booklet and added another badge to his collection!
We didn't have time to hike any of the longer trails to see the larger effigy mounds since we were heading to SOuth Dakota that day and had one additinal stop to make after this one. But this was a really pretty park and we were all really glad we stopped there on our way to check it out.
I created 3 2-page layouts for this park and used the park map, the National Park Passport stamps that we got at the park, as well as photos of several signs that were at the park too add some details to the pages. This pages, along with the rest of the South Dakota layouts, were made using the We Are Memory Keepers Shine collection. Here are the 3 final layouts (please click on them to view them larger):
We left Effigy Mounds and headed toward our second stop that day, Pipestone National Monument in Pipestone, Minnesota!
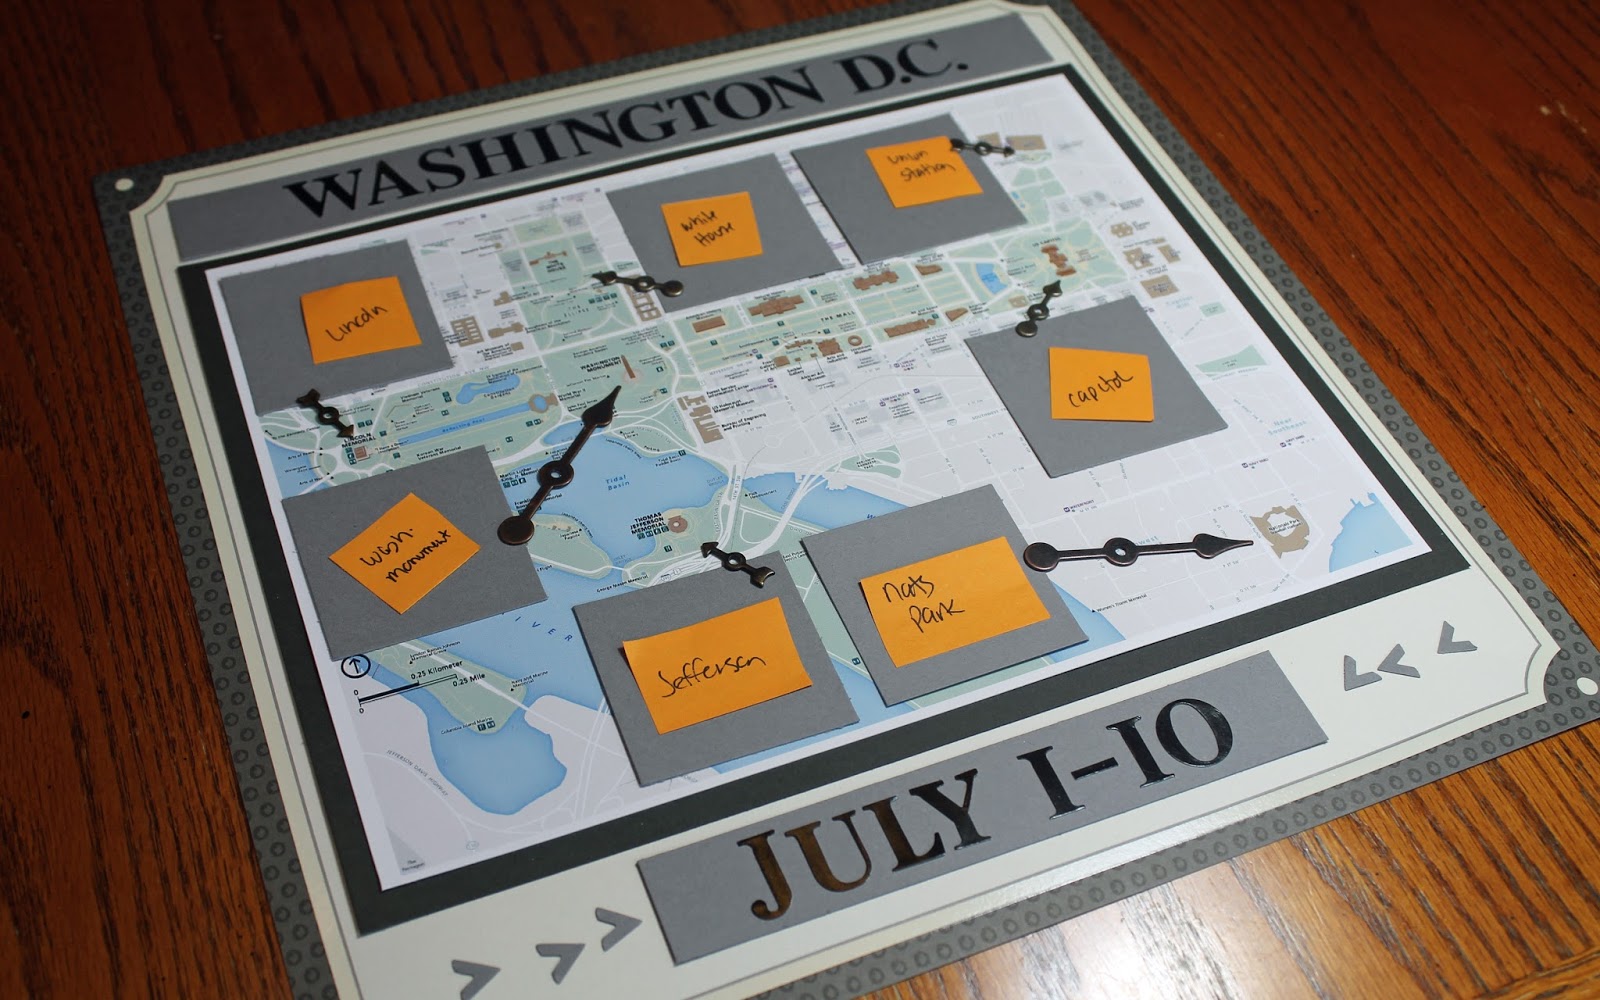
I'm finally getting back into the groove a bit and have started working on a cover page for one of the next albums I'll work on. In July we took a vacation to Washington D.C., so I've been thinking about how I would do album cover pages for this trip. There will be 2 albums for this trip, so this is the cover page for one of them.
I've used maps quite a bit before in travel albums, but this time I wanted to try to highlight the map with a few of the places we visited. There was no way to do this for all of the places we went during that trip, so I'm planning to do more of an itinerary style layout for the second album, and keep this one more simple with just the map and some highlights.
 I was able to find a map that I liked the look of online, and resized and printed it out at home. I then had to decide how many places I would highlight, and how to highlight them. I thought a small, thumbnail image of a few of the places would look nice, so picked a few of the main attractions and decided to highlight those. I chose, resized, and printed out 7 of my photos to use on the cover. I also created a header and footer banners (with grey cardstock and stickers) with just the words "WASHINGTON D.C." and our travel dates to finish it out.
Then it was time to put it all together. I chose a piece of 12x12 paper that had an interesting border around the edge, and I cut some darker grey cardtock to mount the map and the thumbnail photos on. I then took all of these pieces and placed them all on the background paper, and shuffled and moved things around until I liked the look of it. I also had some metal arrow brads that could be used to point to places on the map from each photo.
This layout came together really quickly and even though I switched around the thumbnail photos a bunch of times and thought I might have space to add a few more, I decided to keep it as it was and not clutter it up with more. Here is the final layout:
I'm quite happy with how it turned out, and the color scheme and clean lines are something I hope to carry on to the rest of the layouts in this album. Now I just need to to edit and order the photos from this trip so I can get started!
 When I first started scrapbooking ring-bound albums were not even being made yet, so I started with all post-bound albums. Like any good scrapbooker, as my albums grew larger and larger, I needed to add more posts and had to constantly take the albums apart to add additional layouts or move things around. And the albums were difficult to handle as the lengthened posts were not very sturdy against the weight of all of those pages. They'd bend and twist and I'd dare not handle the albums any more than necessary.
Then ring-bound albums came out and I, like so many others, was saved from the frustration of post-bound albums. Post-bound albums do have their place - if your album will be 20 pages or less then post-bound albums will work perfectly. And there are so many great cover designs for post-bound albums that we are just starting to get now in the ring-bound world.

I really do love ring-bound albums. I converted all of my family albums to ring-bound years ago, and only buy ring-bound for albums now. With one exception - my kids school and activities albums. Their school albums are broken down by school - so I'm managing to keep them small enough that I can still fit them all in a post-bound. My dilemma now is about their sports and activities albums - they are bursting at the seams and I need to either get more post-bound albums to expand into, or switch them over to ring-bound and be done with it. Either way I'm buying more books, so it really comes down to space and storage. And future storage.
 I know there will be more and more pages added as the years go on - my kids do a fair amount of activities and I know for one of them at least, I'm averaging 30-40 pages a year to cover his different sports seasons (I try to keep it to 8-10 pages per season for each sport he's in.) It's basically the equivalent of an album each year. So what do I do....keep them or convert?
By switching I can get more layouts in each album, which will reduce the number of albums I need overall. If I do convert to ring-bound, I could also reorganize the albums by sport since right now it is a mixture of all activities done chronologically.
So, should I stay post-bound or go ring-bound? Help!